(( How to... )) Read Normal Patterns
Introduction
The intention with this tutorial is to show you how to read the pattern instructions for normal patterns on this website. It is quite theoretical; if you want to start tying, you might like the straight forward tutorial Striped bracelet instead.
Preview image
The pattern instruction charts has always a smaller preview image at top. It shows you how the pattern will look like when you are done with the bracelet. The colors in the preview image is just for example, you may exchange the colors as you wish.
Strings
Letter colors
Below the preview image, there is a row of letters, probably starting with an A. The letters corresponds to colors and they go from A to Z.
If the letters are A A A A B B B B, it means that you should start your bracelet with four strings of color A, and four strings of color B (and in that order).
Simple string setup
A simple way to setup the strings are with an overhand knot. Just bunch your strings together, and make the knot at top to keep them together.
While tying, a good method is to fasten the bracelet with tape on cardboard or simply use a clipboard. It is recommended for beginners, because it helps to keep the strings in the right order.
Length
The length of the strings is the most common asked question on the site. The length of the strings vary between wrist sizes, string types, how hard you tie etc. That is why there is no exact instruction on how long the string should be. Personally, I use about 75cm, depending on pattern. After you have done some bracelets, you should be able to estimate the length. Until then, use a lot of string so you do not run out of it while tying.
Difference between odd and even number of strings
Most patterns on this site has an even number of strings. In these "even" bracelets, every odd row has X knots while every even row has X-1 knots (one less). On the rows with one knot less, the two outer strings are not included in any knot on the row.
In the bracelet patterns with odd number of strings, the number of knots is the same for every row. In these kind of bracelets, there is always one string omitted from knots in each row.
Knots
Knot types
There are only four basic knots used in the friendship bracelets. They are the forward knot (fk), the backward knot (bk), the forward-backward knot (fbk) and the backward-forward knot (bfk).
Order of tying
The knots must be tied in order. If you tie the knots row by row, you will always be fine.
You can also make things complicated and tie them in some other order. The only restriction you HAVE to follow is that every knot you tie has to get its 2 strings from two neighboring knots on the row above.
When you get to the bottom
Congratulations, you have made one cycle of the pattern! If you are lucky, you can just continue the pattern by looking at the first row again.
If the string colors at the top does not match the string colors at the bottom, then it will be a bit tricky to continue. A general rule to use is to follow the pattern but ignoring the colors of the strings. Hopefully, the colors will be restored in their right order after one or more cycles.
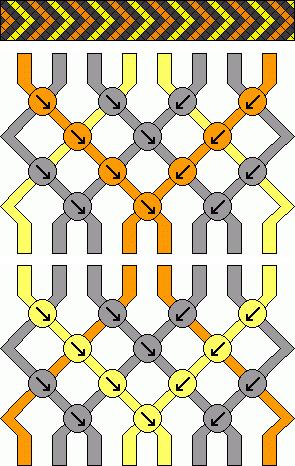
This image below shows how to think when making a pattern that repeats after 2 cycles. When you have gotten to the bottom, then the string colors don't match the top. For example, the leftmost string is yellow but it is supposed to be orange! The lower part of the image shows that the problem will solve itself if you just do the same knots, ignoring the colors.
A pattern that has top colors matching the bottom colors is said to be repeating. These are simpler to tie than the nonrepeating. When you search for patterns on this site (on the "patterns" tab), you can search for only repeating patterns.
Example: tying pattern 36
This explanation is for pattern 36. We will look closer on the knots in the red boxes in the picture below.
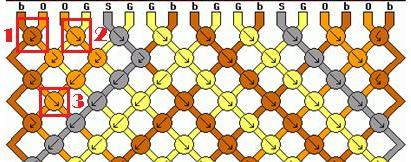
Box 1
In box one, the chart tells us to tie a forward-backward knot with strings 1 and 2 (brown and orange). Tie the knot and move those strings out of the way.
Box 2
In box two, the chart tells us to create a forward knot with strings 3 and 4 (orange and yellow). Once you have created that knot, move the strings out of the way.
Continue tying knots of strings in pairs. Tie strings 5 and 6, then 7 and 8, 9 and 10, 11 and 12, 13 and 14, 15 and 16, 17 and 18. Make the knots according to the arrows in the chart.
Box 3
We will skip some rows (the principle is the same). For box three, you will make a knot out of string 2 and 3 (counting from the left), so it is best to put it to the side. In this row, strings 2 and 3 are both orange and you will create a forward knot with them. Move them out of the way once you are finished and continue on with strings 4 and 5, and the rest of the way across the row.
Videos
Video 1
Video 2
Video 3
Video 4 (SPANISH/ESPA?OL)
Editors
The original author of this tutorial is spiffehgymnast but it was also edited by Stefan, Salani, Squishy5454, Kestrel, k_marie, apprentice13, Alicat, Foz, Dodadoo, taylorswift101, kleinevos, Aklady64 and Masha_Knots.
Uploaded photos (see all 64)
Comments